Saturday, October 31, 2009

Weekend Find

Happy Monday!!
I have not been feeling well since last week so all house projects have been on hold :( However I did do some thrift store shopping Saturday Morning. I found this adorable chandelier for our living room 
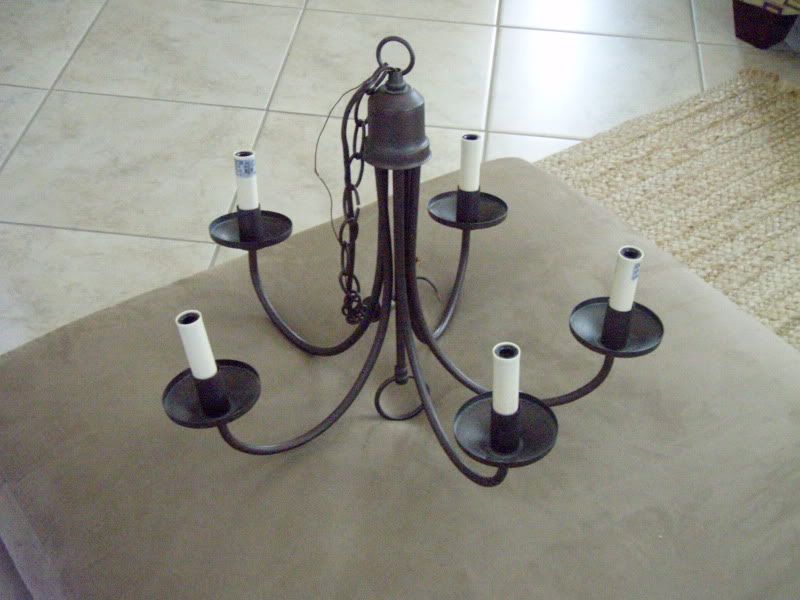
Has the feel of the Pottery Barn chandelier that I have been in love with but its too big for our dining room The Chandelier is a perfect brown color and does not need any paint. All I need to find is the ceiling Kit to hold it, something like this: Have a great work week!

Slipcovers

Our dining room chairs are in need of a major face lift. I love their style and they are super comfy but they are just too dark.
I am thinking of making a white slipcover, but I just cant decide on which style or fabric to choose. Do I want ruffles, do I want floor length, do I want them nice and tight, do I want to make them out of linen or canvas fabric? So many options. Here are a few of my inspiration Pics: From Simply Chic Slipcovers From Decor Pad Oh how I wish we had a pair of wing back chairs From Decor Pad From Life in the Fun Lane So its time to take out the sewing machine and work some magic.

Sunday, October 25, 2009

How to change an electrical outlet

Its so sad that we have so many electrical outlets in our home but only 3 work and out of those 3 only the top part of the outlet has power.
So the Mr. got to work! Before & After
What you Need:
  • A Circuit tester which is used to check and see if there is any electrical current running throughout the electrical wires.
  • A Screw driver
  • New outlet which should only cost you around $0.50
1. VERY IMPORTANT: Turn off the power to the outlet at the fuse box or Circuit Breaker. 2. Test the outlet with the circuit tester on an electrical appliance to make sure the power is off. Place the tester's probes inside the plug. If the tester's light goes on, recheck the main power and retest until there's no power in the outlet. 3. Unscrew the cover plate and remove it.

4. Unscrew the outlet and pull it out of the wall. It should come out a few inches. Set the screws aside.

5. Loosen the screws holding the wires and remove the outlet.

6. Attach the wires to the new outlet. Wrap the wires around the terminals with needle-nose pliers or your fingers.

7. Tighten the screws around the wires

8. Screw the outlet back into the wall.

9. Screw the cover plate back on (we did not screw our new plates on because we are painting the room next).
10. Reactivate the proper circuits at the fuse box and test your work. Tada!

Thursday, October 22, 2009

I GOT A MAC!!!!!

Wow I thought this day will never come, we own a Mac!! We have been searching for a new lab top but wanted to wait for the Thanksgiving sales. Well, that didn't happen, on Sunday our lab top decided to commit suicide by falling off the sofa... just wonderful. Poor little lap top, we have been together for so many years... So we started to search for new laptops and to see what deals are out there and Nothing! Either too much money with not enough memory or just too much money. One of the Mr's friends was selling his 17in Macbook Pro but we really could not afford dishing out that amount off money at the moment. After all week searching and finding absolutely nothing we bit the bullet and bought the MacBook Pro. Its sooooooo amazing!!! Now if I only knew how to use it??? Thank you Honey!!!!

Wednesday, October 21, 2009

Baking a Holiday Ham

The Holidays are right around the corner and I thought I would give baking a Holiday Ham a try. Also its the Mr.'s favorite, he can make a ham and cheese sandwich everyday and enjoy it as if it was the first time he's ever eating it.
Its a very simple recipe and hopefully most of the ingredients you will have in your pantry
  • 1 cup maple syrup
  • 1 cup orange juice
  • 1 cup ginger ale
  • 1 cup brown sugar
  • 1/2 cup honey
  • 1 (10 ounce) jar maraschino cherries
  • 1 (12 pound) fully-cooked, bone-in ham
  • 1 (15.25 ounce) can pineapple slices in juice, drained
  • 1 box round wooden toothpicks
  • Oven bags
Directions:
  1. Preheat the oven to 350 degrees F (175 degrees C).
  2. In a medium bowl, mix together the maple syrup, orange juice, ginger ale, brown sugar and honey. Stir in the juice from the maraschino cherries, and half of the cherries. Score the outer edge of the ham with a sharp knife in a diamond pattern (Most hams come pre-sliced, so if yours is pre-sliced you do not need to score the ham). Cuts should be about 1/4 inch deep. This will allow the ham to soak up the juice.
  3. Place the ham into an oven bag, and carefully pour the juice mixture over it, keeping all of the juice in the bag. It may look like there is too much juice, but the ham will soak it up while baking. Place the pineapples onto the top of the ham, and secure with toothpicks. Place cherries into the centers of the rings, and secure with toothpicks also. Tie the end of the bag closed with the ties provided, place in a large roasting pan, and cut a few small slits in the top of the oven bag.
Here is my ham all ready for the oven 4. Bake the ham for 2 hours in the preheated oven. Remove ham from bag to a serving plate, and let stand for 10 minutes before carving Tada! Hope you enjoyed it,

Saturday, October 17, 2009

Ohhhh How I love Burlap

Its such a rough fabric but looks so chic against a soft pattern like Linen or cotton. Plus, its super cheap!!!!! Joann Fabric has a it for $2.49/yd plus their 40% off coupon comes out to $1.49/yd. Love this white slipcover sofa with a Burlap throw pillow
Credit 0000, These are gorgeous Credit Credit And this is my candidate for a burlap make over

Friday, October 16, 2009

Preparing for our Master Bedroom Makeover

Hopefully we should be done with the whole bedroom by early 2010. Here is a Before Shot:
Things to finish by Monday:
  1. Finish filling in the knob holes on the nightstands, Sanding and then Painting.
  2. Replace the broken Window Sills
  3. Hem the drapery
  4. finalize the paint colors.
Our color theme is based off this pillow from Target
Have a Great weekend!!